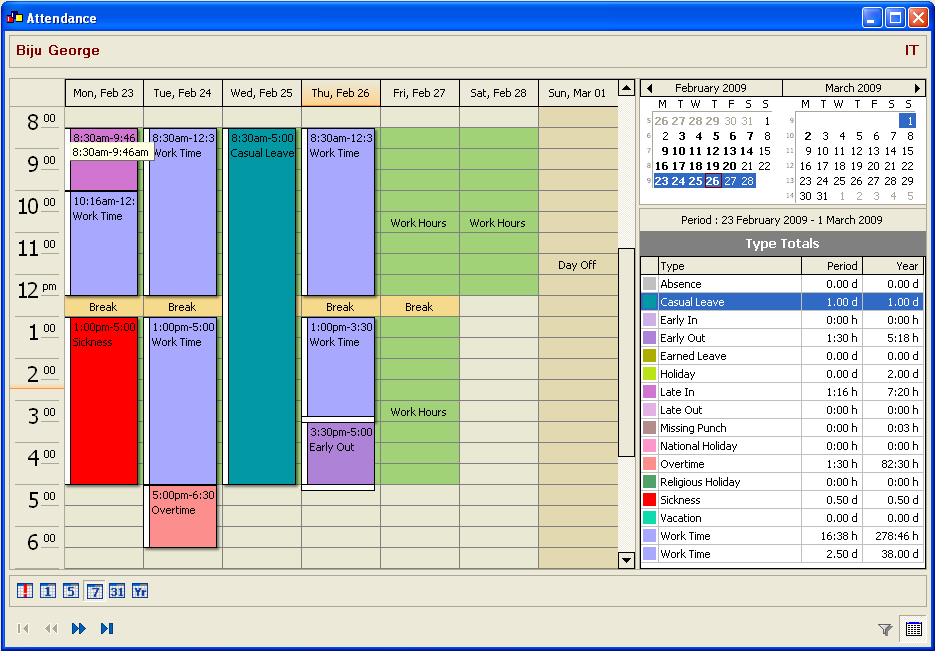
The Attendance interface provides an integrated view of all the attendance related (absence/presence) information about the employee. The information from different modules like Holiday list, Weekends, Roster duty plans, Time registration entries and custom attendance/sick entries are displayed on this screen.
The Overview Screen is same as in Employee interface(Employee module) displaying the employee details.
Detail
Screen:

The windows availlable on the screen
are:
-
Legend calendar window on the right top of the screen allows selecting a date of interest to view the attendance details. The legend calendar displays the dates with attendance data in bold letters. The selected date/period is highlighted. The current date is displayed boxed in a square.
-
Main calendar window displays all the attendance related information as time slots plotted on the calendar. The Roster and the weekend holidays related to the selected employee are displayed as the background. Other attendance entries related to absence or presence are displayed as stripes plotted in the color of the attendance type. The multi color attendance entries on the calendar can be interpreted using the legend of attendance types on the right side of the main calendar.
-
View selector toolbar selects different views provided by the main calendar window.
Different views provided by the main calendar are:
-
Today button : Takes you to the current day
-
Day view: Displays data for one day.
-
Work Week view: Displays data for the work week.
-
Week view: Displays data for the whole week
-
Month view: Displays data for the month.
-
Year view: Displays data for the year.
All these views also allows add/edit/delete of attendance data.
-
Type totals window. It displays attendance types. The details displayed in the window are
| Type | Name of the attendance type |
| Color | Color denoting the attendance type |
| Period | Totals for the selected period |
| Year | Totals for the year |
Working with Attendance
On the attendance screen, the actual and planned work hours against a selected employee can be compared visually. The planned work hour is shown in the back ground and the actual work hours are shown on the foreground. Data acquired by the time attendance devices are also displayed on this screen.
To view the details of one particular employee, the employee’s details screen can be opened from the Attendance overview screen.
Creating new entries in
attendance
New attendance entries can be added
by following the underwritten instructions:
-
Select the attendance type that needs to be registered in the ‘Type Totals’ list.
-
Select the date from the legend calendar window. The selected date will be displayed on the main calendar window depending on the view selected on the view selector window.
-
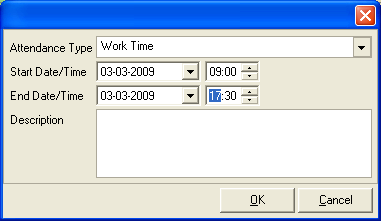
In a detailed day view like Day view, Work week view or Week view, the entry can be created by click-drag of the mouse. Click to mark the start date-time and drag until the end date-time. Alternate way - an entry can be created by clicking on the selected day. This method works in any view. A data entry window will be displayed on clicking the day. All the details related to an attendance entry can be furnished on the data entry window

-
Attendance type – The attendance type can be selected from the list
-
Start date/time
-
End date/time
-
Description – any extra information about the attendance entry.
-
-
Once the details are supplied and confirmed by clicking the ‘OK’ button, the entry will be created on the selected date.
Pre-defined attendance entries (System defined)
Attend HRM provides a number of
system defined attendance types. These types can be used
exclusively but not edited.
-
Time registration: The time registration entries are automatically imported from the Time attendance devices by Attend HRM. Those entries can be viewed on this screen. Time registration entries can also be added to the attendance screen manually. This option can be useful in case the time attendance device is faulty or no hardware device is available.
-
Sickness: Attendance entries for absence due to sickness can be created using Sickness type.
-
Annual leave: Attendance entries for absence due to vacation or annual authorized leave can be created using ‘Annual leave’ type
-
Overtime:Overtime type can be used to create attendance entries for overtime/additional work hours.
Modifying an attendance entry
To modify the details of an
attendance entry,
-
Select the attendance entry
-
From the right-click menu, select the option – ‘Open’
-
The data window with the details of the selected entry will be displayed. The necessary modifications can be made
-
Once modifications are done, the entry can be saved. It will be redrawn on the main calendar window with the modified details
Easy way to modify Date and time
-
Select the attendance entry with the mouse.
-
Drag it to any of the other date and time. Click 'OK' on the data window to move the entry.
Deleting an attendance entry
-
Right click on the attendance entry and select the option ‘Delete’ from the menu.(The delete key on the keyboard also can be used) An information window will appear - “Are you sure that you want to delete?”
-
Select the option ‘OK’ to delete the entry.
Note: A video of 'Working with attendance' is available in the video help file. It will be useful in understanding the function.
Copyright (c) 2003-2008 Lenvica Computer Solutions


