
Forum Replies Created
-
AuthorPosts
-
in reply to: Database Backup #20272
Hi Rahulji,
We have an interface to create database backup in administration module.
What do you want to do?
Create a database backup
———————————————————–
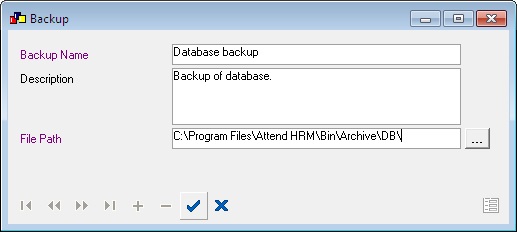
Go to Administration > Backup
Add a new database backupBackup Name: Name provided for the backup
Description: Backup description
File Path: Path of the backup file to be created
Click save, then your backup will created in the selected folder.
Thanks,
Muneer
Attachments:
 in reply to: How to change employee name of Administrator #20271
Hi Rahul,
Good Morning!
We can clear the employee name of admin. But you have to arrange an online session and contact our customer support executive.
Only our support team can do this task.
Please forward a mail to support@lenvica.com
Or
Create a ticket from http://www.lenvica.com/forum/open.phpThanks
in reply to: Calculate Surcharge #20267Hi Rahulji,
We are working on it. You will get an update on this April first.
2017 Onwards: If Taxable Income is between 50L and 1 Cr, Surchage is 10% of income tax.
15% of income tax, where total income exceeds 1 Cr.
These are the changes in surcharge.
If any corrections, write with us.
Thanks.
Hi,
Installation Requirements
The software and hardware requirements are:
Operating system: Microsoft Windows 2000 and above
Computer with Intel Pentium III or higher
Minimum 256 MB of RAM
Minimum 40 MB of hard disk space (at installation)
Recommended screen resolution: 1024 x 768 or higher
1. Only a windows user with administrative privilege can install Lenvica HRMS on a computer.2. Lenvica HRMS ships with Firebird 2.0 database server by default. Firebird 2.0 will be installed as a windows service and will be listening to the client requests on TCP port 3050. It is to be ensured that your firewall is not blocking port 3050 to ensure the proper functioning of the software.
in reply to: Retirement Age #20257Hi,
The default retirement age in our software is 62.
It is possible to change the retirement age. Please contact our support team, only they team can do that thing.Create a ticket from our website regarding this. http://www.lenvica.com/forum/open.php
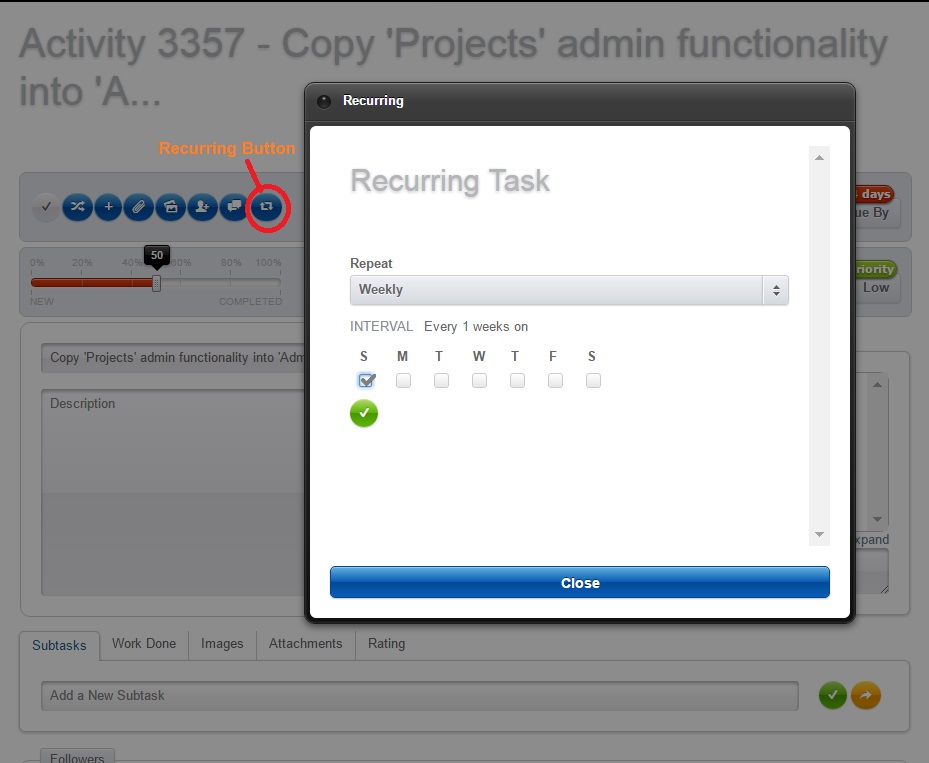
in reply to: Recurring Task #20253Recurring task
In tasks under ess, we have an option for recurring tasks.
Just simply do the following things:
1. Create a task
2. Click the recurring button in the top
3. Select the interval weekly and choose a due day
4. Click saveThen the task will recur if you completed that task.
This option is available only in the Lenvica HRMS updates from 3.8.76
Attachments:
 in reply to: 503 internal error #20252
Hi Rahul,
Actually that is not our software issue, the IIS in your system is down because of some reason. Just do the following things to solve this issue.
1. Open IIS Manager. (Control Panel ->Administrative Tools -> Internet Information Services (IIS) 6.0 Manager)
2. Double click on the the root of the tree ‘Connections’ (This will be computer name)
3. Click application pool
4. Right click on the default application pool and click start
5. Restart the IIS and try again:)
in reply to: Configure Bonus in salary #20250Add advance details of an employee:
1. Go to Salary > Advance
2. Locate an employee
3. Go to the tab 'Advance'
4. Add advance detailsAdvance Type Type of the advance Date Date on which the advance is given to employee Principal Amount The actual amount given [tr]
[td]Interest Amount[/td]
[td] Calculate the interest using interest calculator[/td]
[/tr]
[tr][td]Recovery Mode [/td]
[td] Whether recovery mode is Lumpsum or installments[/td]
[/tr]
[tr][td]Lumpsum[/td]
[td] The total amount paid, including interest[/td]
[/tr]
[tr][td]No of Installments[/td]
[td] Specify the number of installments[/td]
[/tr]
[tr][td]Recovery Cycle[/td]
[td] Recovery period like monthly, yearly etc.[/td]
[/tr]
[tr][td]Recover From[/td]
[td] Specify the date on which the recovery should start[/td]
[/tr]
[tr][td]Remarks[/td]
[td] Remarks, if any[/td]
[/tr]
[tr][td]Recover from Salary[/td]
[td] Whether the amount recover from salary or not?[/td]
[/tr]Calculate the interest for an employee:
1. Go to Salary > Advance
2. Locate an employee
3. Go to the tab 'Advance'
4. Click on salary advanceView the installment details of an employee:
1. Go to Salary > Advance
2. Locate an employee
3. Go to the tab 'Installments'Update the recovery details of an employee:
1. Go to Salary > Advance
2. Locate an employee
3. Go to the tab 'Recovery'
4. Update the recovery detailsin reply to: Configure Bonus in salary #20248Bonus
Interface to manage the Employee Bonus.1. Define the period and pay date for the bonus
2. Define formula to calculate bonusDefine a new bonus type:
1. Go to Salary > Bonus
2. Specify the detailsBonus Name Name of the Bonus Bonus Period The period from and to for the bonus Pay Date Pay date for the bonus [tr]
[td]Formula [/td][td] Formula to calculate the bonus amount [/td]
[/tr]
[tr]
[td] Maximum Bonus[/td][td]Amount The maximum bonus amount that can be paid [/td]
[/tr]
[tr]
[td] Round Type[/td][td]Rounding option for the bonus amount. Ex: Round to two digits, round to nearest, lower or higher integer etc[/td]
[/tr]Add employees eligible for bonus:
1. Go to Salary > Bonus
2. Locate an bonus type
3. Add employees to the bonusRecalculate the bonus:
1. Go to Salary > Bonus
2. Locate an bonus type
3.Recalculate the bonusView the bonus details of each employee:
1. Go to Salary > Bonus
2. Locate an bonus type
3. Locate an employee
4. View the detailsin reply to: Edit or Delete Qualification #20244H Rahul,
Edit and delete are purposefully disabled. But, if you have made a mistake, our support team can correct that for you.
Please give us an online access to your desktop.
Regards,
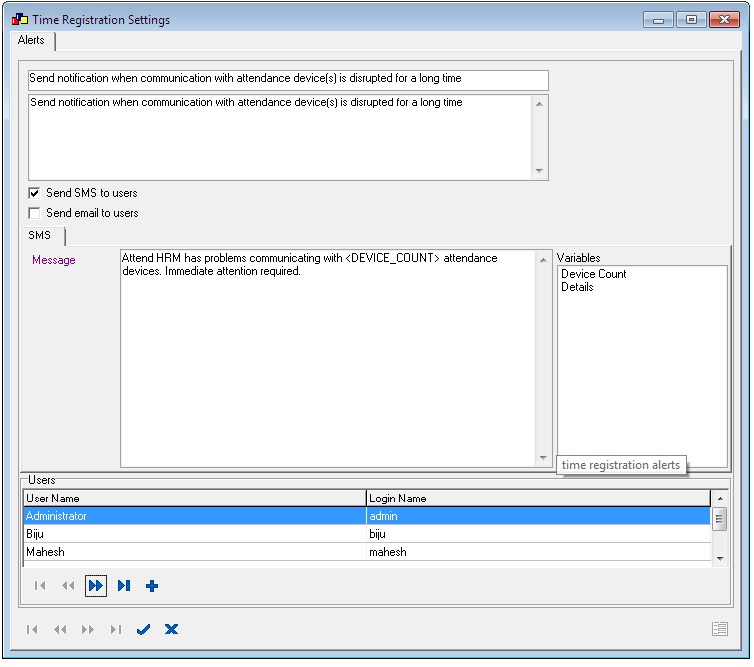
MuneerConfigure notification when communication with attendance device is disrupted for a long time:
1. Go to Time Registration >Time Registration Settings
2. Go to tab 'Alerts'
3. Locate the alert
4. Select the recipient
– Send SMS to users
* Modify the subject and content part using predefined variables
* Select the users
– Send email to users
* Modify the subject and content part using predefined variables
* Select the users
5. SaveYou can also configure notification when employee punches IN or OUT:
1. Go to Time Registration >Time Registration Settings
2. Go to tab 'Alerts'
3. Locate the alert
4. Select the recipient
5. Save
Attachments:
Allow to view the employee details those who are reporting to users:
1. Go to Administration > Administration Settings
2. Go to tab 'Settings'Configure a welcome message for newly joined employees:
1. Go to Administration > Administration Settings
2. Go to tab 'Alerts'. Locate the alert
3. Select the recipient
-> Send email to employee
Modify the subject and content part
-> Send SMS to employee
Modify the message part
4. Save the changes
Attachments:
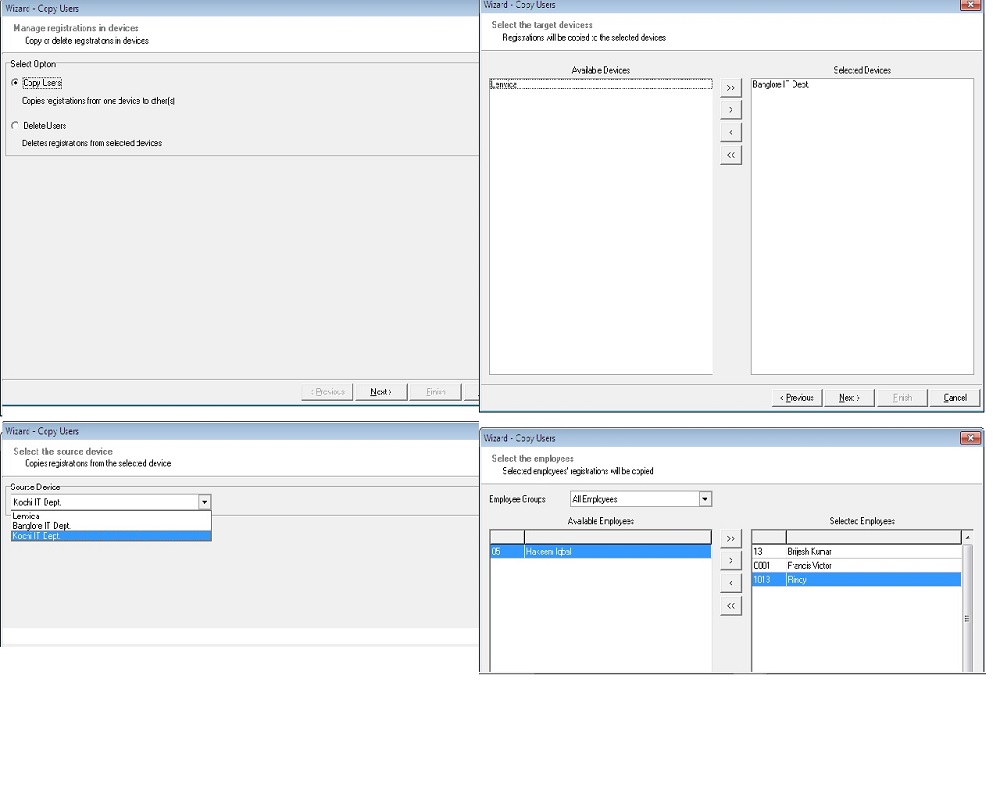
 in reply to: Copy the registration details to any other devices #20234
Hi,
Copy Users
Copy Users copies the registration details to any other devices placed in different locations. This would help the employees to punch in any location. This module also deletes the registration details from any device.
Copy the registration details from one device to other devices:
1. Go to Time Registration > Copy Users
2. Copy registration detailsPlease find the attachment for more…
Attachments:
 in reply to: I need a report of attendance history #20229
Attendance History
This feature shows the complete history of attendance module. It gives the details about all modifications on attendance data.View attendance history:
1. Go to Attendance > Attendance HistoryExport attendance history:
1. Go to Attendance > Attendance History
2. Locate the history
3. Export to excelin reply to: Apply for Holiday from ESS #20217Hi,
It is so simple, just do the following things1. In the Leave module, add a new Holiday, click 'Next' button, check the checkbox showing in the wizard and click 'Finish' button.
2. Go to Entitlements, select employees and assign that holiday type to employees.
3. Go to leave settings, Check the box 'Enable holiday picker in Employee Self Service'.
4. Go to Administration module, Click ESS rights, Select employee group and enable the holiday picker option.Then the manager will get a request and he can approve the holiday request.
Regards,
Muneer -
AuthorPosts